Showing posts with label Craft. Show all posts

Tuesday, June 10, 2014

Trick of the Trade–Keep Your Fonts Straight

First world problem here.

I have an unhealthy love of fonts.

So much so, that when I’m putting something together and am pondering which font to use, I can’t even grasp my favorites because I have so many.

Here’s my solution…

WORD FILE WITH FAVORITE FONTS

I keep a word file with an alphabetical list of my favorite fonts IN the font so I can readily see it. This way I don’t have to sort through my other fonts I use seldomly in the font drop down. I just open the word document and quickly scroll through to spot the perfect font for said project.

Here are my non-script faves…

image

image

image


And my script favorites…

image

image

image

Sunday, May 5, 2013

Mother’s Day Gift Idea–Shrinky Dink Silhouettes

Are you ready for your heart to completely melt? I hope so!

I’ve seen these around on other blogs, but it took a good friend awhile to perfect the technique. So I hope this works well for you!

Here is the exact link for the “shrinky dink” material we used in case you’re looking for a good buy.

Before you follow the instructions below, take a side picture of your child (or children) on your phone. IF you’re talented enough to get them to stand still in front of a plain background, kudos to you. I had to take about 50 of my 2 year old daughter before I got one that would work.

clip_image002[5]

Shrinky dink material

Red & Black Fine Tip Sharpies

Scissors

Hole Punch

Silver Jewelry Clasps

clip_image003

clip_image002

Let me know if you have any questions! Now go bless the socks off someone by following this tutorial. =)

Thursday, February 7, 2013

Thoughtful Thursday–Gumball Necklaces!

Gumball Necklace Tutorial w Words

I’ve mentioned that I coordinate a local MOPS (Mothers of Preschoolers) group, and I can’t believe I haven’t shared more of our crafts with you! So…allow me to give a tutorial on our most recent craft, gumball necklaces!

Supplies

  • 8 gumballs (follow this link for the best bulk price I found)
  • 1 yard or more of matching ribbon (ours was ~1/2” wide, do longer than 1 yard if you want your necklace length longer)
  • 1/2 yard of 1” matching ribbon (for the bow – we got our ribbon from Michael’s)
  • Metal skewer (follow this link for the skewers we used, or if you just need some amazingly cheap skewers that are good quality!)
  • Tape
  • Toothpick

Directions

1. Use a metal skewer to pierce the dubble bubble logo side of the gumball. Hold the top of the gumball steady as you guide the skewer carefully.

IMG_6941

2. Flip the gumball over and pierce another hole directly opposite to the first hole. If you try to poke a hole straight through both sides at once, the gumball will crack. Poke holes in all 8 gumballs.

IMG_6942

IMG_6944

3. Tape a toothpick TIGHTLY to the ribbon.

IMG_6946

4. Then use the toothpick to thread the ribbon through the gumballs. Tie a know between each gumball as you string it.IMG_6947IMG_6949


5. Once you’ve finished stringing all gumballs and tying knots, remove the toothpick from the ribbon and tie a small knot with the ends of the ribbon. Then, use the thicker ribbon to tie a bow over that knot.

IMG_6953

IMG_6954

IMG_6955

AND…the thoughtful part…we encouraged our girls that if these necklaces weren’t there thing (how could they NOT be, right? Winking smile), to give them to a girlfriend as an early Valentine’s gift thanking them for their friendship. So…my parting thought for all you blog readers out there, don’t let Valentine’s Day pass without telling a good friend how much you appreciate them.

Tata for now!

Friday, February 1, 2013

Friday Faves - Apples & Traditions

#1. honeycrisp apples

Honeycrisp Apples! Pretty much enough said.
#2. our new favorite tradition
IMG_0329
IMG_0366


I’ve been wanting to start having my kids memorize Bible verses, but wasn’t sure how to go about doing it. I didn’t want it to feel like something that was forced by any means. I wanted them to enjoy it, and look forward to doing it! So, kind of on a whim, I told Cooper we were going to start memorizing verses, and for each week he could memorize our verse for the week, we’d go get frozen yogurt on Saturday. I wanted to see if it was something he’d be interested in.
Well, we’re two for two and getting ready to go on week #3! He’s loving it! He’s so proud, it’s helping us actually LEARN values in the Bible (‘cuz we’ll chat about what the verse means and remind one another if we see something that pertains to it throughout the week), and frozen yogurt is a perk!
So, as I had mentioned, I started it on a whim so I didn’t sit down to plan out verses initially. We began with Genesis 1:1 “In the beginning, God created the heavens and the earth.”
Then, I sought out the following link on my Pinterest board. It’s perfect! Week #2 we did 1 Thessalonians 5:11 “Be kind to one another and build each other up.” We’ve now got it printed, laminated and ready to go!
ABC Scriptures
Here was the card we memorized this past week:
IMG_6802
Here’s our next verse we’ll start tomorrow…
IMG_6803
So easy, and beyond rewarding! Maybe it’s a tradition you could start, too! Seriously…froyo, weekly? Okay, so it doesn’t have to be that. Choose something that will motivate your own child.
Happy Friday!

Thursday, December 20, 2012

Thoughtful Thursday–Reindeer Noses To Go

Reindeer Noses To Go Picture

I saw this idea, and sometimes when I get an idea stuck in my head, it’s like OCD and I just HAVE to do it, mono or not. Winking smile

After I saw this adorable idea, I knew Cooper and I needed to make them for his classmates. Bite-sized, perfect little adorable cookies! I’ll be honest, it wasn’t has simple and easy as the original blog states. BUT…it made an amazing, traditional, baking holiday memory for my son and I, and he was SO proud to share with his friends. And, it really only took an afternoon, and a bit of the evening. Not too shabby for 27 Reindeer Noses To-Go kits! Refrain from doing the math – it’s 243 1” cookies total. Moving right along..

Her sugar cookie recipe, was absolutely perfect! AND…I should save this for a trick of the trade (I may repeat it next Tuesday, don’t judge!), but why have I never used wax paper to roll out cookie dough before? I laid out a sheet of wax paper, put my glob of cookie dough, then laid down another sheet and rolled away. No sticky mess! Then, I used a 1” cookie cutter (yes, they are teeny tiny people!) to cut out all the little noses. I used rolling pin spacers (1/4” – to make the dough a uniform thickness) and mine cooked for 11 minutes and were perfect.

Baking…DONE! That was the easy part. Oh, and kind of a silly tip, but when I took them off the cookie sheet, I counted out 8, then put aside a 9th on a separate sheet so I could keep count of how many “kits” I had already baked.

Now, onto frosting.

The recipe on this website seemed a bit off regarding water, but she did say to play around with it. I added quite a bit more than what was recommended. But again, play with it and see what works for you. And, be prepared to either take your time, or get a hand cramp, or both.

You know how you read all these blogs or facebook posts about perfect, holiday traditions and wonder why yours NEVER seem quite so perfect? Well, there was definitely a moment during frosting where that thought crossed MY mind. I took a deep breath, took some tylenol, played with my kiddos, THEN put on some Christmas music and got back to work. After relaxing and getting perspective, we DID have that awesome, traditional moment. =) See? I didn’t picture the play-doh mess that happened off in the corner while I was frosting said cookies. Thankfully, on the tile, and…worth it ‘cuz the kids had a blast playing!Baking cookies

The frosting hardens, which will be GREAT for packing them up for delivery, but you do have to work quickly if you’re crazy and are doing 200+ 1” cookies!. Another tip, use a LOT of food coloring. Mine are pretty light colored brown, I would’ve preferred darker, but I still ADORE how they turned out. And, Rudolph’s nose is sort of…shhh…pink! Gasp! Thankfully you can’t tell in these pics…But do you recall

Final bit of information if you choose to make your own! I think the mason jars I used are half pint. I just put a paper lid in, I kept the metal inserts. I stacked the 8 brown ones like so, then placed the red one in front you so you can see it!Rudolph
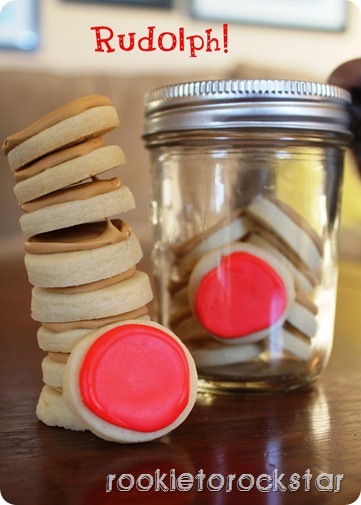
My husband thought this was overkill, but I LOVE how it looks! So aesthetically pleasing! =)

AND…if you choose to make your own, here’s your free printable! Perfectly sized to fit the insert for the Kerr mason jars. Enjoy!Reindeer Noses To Go Labels

If you’re having a hard time getting the printable, just shoot me an email. I’d be happy to email you the original. =)

And, as if you haven’t gotten enough pictures, here’s my son after placing them in all of his classmates cubbies at school. He was SO excited!!Cooper with reindeer noses to go at school

Oh, and proof that I made a vat of them! And used two printouts of the free printable! Reindeer Noses Packed Up

Linked up today with…

Friday, December 7, 2012

Friday Faves–Key Chain

**WARNING: POTENTIAL CHRISTMAS GIFT IDEA BELOW**

I used to have an adorable keychain of my son’s 6 month old professional pictures. But, he just turned 4, and time has taken its toll on the keychain. I wanted to use our most recent family photos to somehow create a new keychain to keep, and this time include BOTH my kiddos. I’d been mulling it over until I came across this adorable keychain in Michaels (they were on an end cap near the frames section):IMG_5778Now you’re probably not caring wondering how I incorporated both my kids, right? That’s only one sweet face right there.IMG_5781 I give you side two! No…unfortunately the keychain wasn’t SO cool to come this way. What I did was purchase two of them, and then used ANOTHER one of today’s Friday faves…image

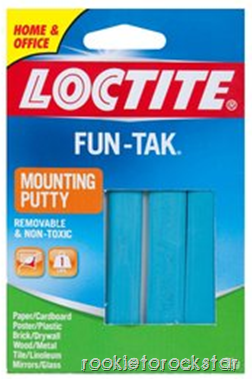
If you have never been savvy enough to use mounting putty, aka adhesive putty, allow me to introduce you.

My first introduction was probably maybe cheerleading in high school? Did I really just actually admit to being on cheer on the interwebs? Winking smile Then, when I was an RA in college, holy moly did this come in handy hanging posters galore! And finally, most obviously, my teaching career. But, I do still use it periodically. Birthday parties, holiday décor, etc. Basically, it kind of works like you would imagine gum would, but it won’t ruin whatever it use you’re sticking it to. You do have to heat it up to get its sticking power to work. I wasn’t sure it would actually hold the two  keychains together, but so far its held up for almost 3 weeks now ON my set of keys! Yay! Basically, I just heated some up, put it on the back of one keychain, and smashed them together.

And it was a whopping $5 altogether (after coupons of course, they were $3.99 apiece). So, perhaps a Christmas gift for grandparents? Or a spouse? What are you waiting for? Go check out Michaels! They also have really cute initial keychains that are similar, but with a rhinestone initial next to a small square picture frame.

Thursday, December 6, 2012

Thoughtful Thursday - Welcoming Neighbors

Neighbors…what feelings does this conjure up for you?
Kramer from Seinfeld? Quirky, far too comfortable bursting through your front door, yet hilarious and makes you smile?
Ned Flanders from the Simpsons? Always condemning and just ticking you off all the time?
Or do you have totally annoying pot heads who party hardy all the time and keep your baby awake? (yes, New Girl is one of my absolute FAVORITE shows)
OR…did you luck out and get a sweet old, super wise man who talks through all your problems with you, like Wilson from Home Improvement?
OR…did you totally, utterly, and completely luck out and get the sweetest, best friend, always-there-for-you kind of neighbors like Fred & Ethyl Mertz from I Love Lucy?
I had neighbors pretty darn close to Fred & Ethyl, so when they moved recently (thankfully only 5 minutes away), I was bummed, but knew I needed to put my best foot forward with the incoming neighbors. So…here’s what I came up with. I slightly altered the free printable tag I found here.
IMG_3153
Tells my poor neighbors right off the bat that I’m super corny, but, why not reveal a little bit about myself from the get go? Yup, those are eclairs packaged up in there and the tag reads, “I declair you welcomed to the neighborhood”. My husband actually rolled his eyes when he saw what I was doing. hehe On the back I included a note that read as follows:Neighbor Letter
So, even if you have a horrifically terrible neighbor like…
Marlyse from Parenthood (yes, another fave of mine), it wouldn’t hurt to welcome them. Everyone needs love now and then. So, even if it’s a bouquet of flowers, or a Starbuck’s card, or a list of your local favorite restaurants, walk on over, knock on your neighbors door, and welcome them.
OR…maybe you’ve been in your house for like FIVE YEARS and still haven’t met them! Do a little something to wish them a Merry Christmas and introduce yourself. It will also teach your kids how to treat others. I had a blast doing this with my kiddos. =) Look at those adorable feet…and smiles. =)IMG_3148
Cooper and eclairs
Oh yes, and here’s my version if you’re up for making eclairs. YUM!I declair picture
Enjoy, and have fun making friends with new (or old) neighbors.