Monday, February 7, 2011

Dijon Chicken

IMG_3991 We all have those few recipes that are our “go to” recipes when we have little to no energy for dinner. This is one of my staples that my husband is never disappointed with. Hope you and your family enjoy it!

Chicken Dijon

4 chicken breasts

1 tsp. lemon-pepper seasoning

¼ tsp. onion powder

2 T butter

¼ cup milk

2 tsp flour

1 T Dijon mustard

Rice

Directions:

Cook rice. Sprinkle chicken with lemon-pepper and onion powder. Cook chicken over butter, 8-10 minutes, turn once.IMG_3982IMG_3983

Measure pan juices, add milk to make 2/3 cup. Return to skillet. IMG_3984 Stir ¼ cup milk into flour until smooth; add juice mixture to skillet. IMG_3985 Stir in mustard. Stir until thickened and bubbly, then cook 1 minute more. Spoon over chicken.IMG_3986

Enjoy a delicious, easy dinner! Yum!

IMG_3991

Sunday, February 6, 2011

Harold and the Purple Crayon

My son LOVES books! So, I tend to have a weakness when it comes to adding to our book collection. I recently gave in and joined the Borders Rewards Plus program, which gives you an additional 10% on each purchase, on top of their already fantastic coupons, and you get free shipping for a year. It was only $20, and you get a coupon book immediately that includes a $10 coupon, a free coffee beverage, and more!

With that said, I bought a few new books – one of them was a Richard Scarry, which are always a hit, another was Harold and the Purple Crayon by Crockett Johnson: 50th Anniversary Edition. If you haven’t read the Harold books before, they’re basically about a cute little boy who creates his own adventures using his big purple crayon. He then interacts with what he has drawn. After reading them for a few days, Cooper and I headed out to our driveway to “reenact” a few of the scenes. Cooper had a blast! Here’s what we came up with (all the scenes happened to be from “Harold’s Fairy Tale”):

Scene #1:

IMG_3999IMG_3957

 Scene #2:

IMG_4000 IMG_3951

Cooper even got so into it that he continued to “climb” the stairs, in various ways:IMG_3953

IMG_3954

Scene: #3

IMG_4001

IMG_3949 

 Scene: #4

 IMG_4002  IMG_3958

And, I’ll look forward to pulling out other ideas from this book as Cooper gets older. Having him come up with his own “Purple Crayon” Adventure. There are lots of lesson plans associated with this book, and while I don’t plan on home schooling, there’s nothing that says we can’t have fun with our books, AND learn, right? ;)

And while we were out having fun, some neighbor friends came over and we “sailed” a ship in the gutter. I know, sounds gross. But they had been playing with water, so it was clean, hose water. How adorable is Cooper and daddy?IMG_3965

Lame-o mommy alert saying up ahead…

I just want to nibble on those bare piggies! ;) IMG_3974IMG_3976Anyhow…life lesson? Get out and start enjoying the nice weather! (If you live on the west coast that is…sorry to all others).  It will be worth it, even though you sometimes feel like your dragging your sorry butt out there (oh yeah, have I mentioned I’m pregnant and due in one month? hehe) Happy Sunny Days!!


Saturday, February 5, 2011

Countdown to Kisses…

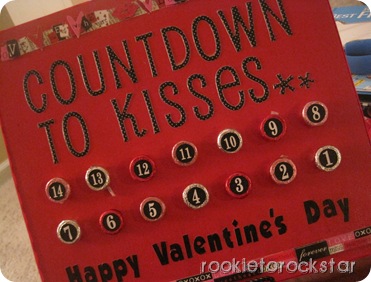
Valentine’s Day is coming up and, while this should’ve been done 5 days ago, it’s done now and I thought I’d share. I found the idea to make a “Countdown to Kisses” board on the blog here on infarrantly creative. Here’s how my version turned out, and the details on how to create one of your own.IMG_3940 Supplies:

12”x10” board (I used MDF)

5/8 drill bit

(I bought a pack of 6 drill bits for only $9.49 at Home Depot, they had a single 5/8 for only $3.89 or something, but I figured I’d use them in the future anyhow, the point being, they’re pretty cheap and adapt right into your power drill)

Sandpaper

Primer and paint

(Duh…spray paint is best, I used regular because I already had it, but painting the holes was quite a chore)

Scrapbooking Materials

(And/or my new wish list item…a Silhouette SD cutter, it cuts out letters in any font you have on your computer!! Why am I just now learning about this handy tool? Oh hubby…birthday? Or better yet? Mother’s Day? ;)

Hershey Kisses (Valentine’s edition)

Mod Podge (I used gloss)

Foam brush

Easel

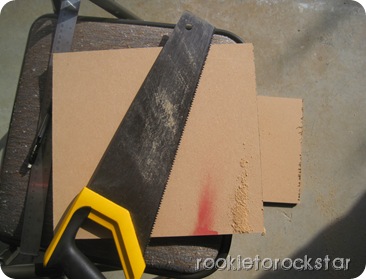
Step #1: Cut board 12”x10”. And just to prove how simple a project can be, I used an old school saw to cut the board, check it…IMG_3897 I measured down about 5 1/2 or 6” to mark where to drill the holes. Then, measure out every 1.5” and make a mark. IMG_3898 Using the 5/8” drill bit, drill your holes, but not all the way through the board. The top of the bit will poke through the back, but leave some covered so the kisses will set in and stay put. I had to keep checking, but once you finish one or two, you’ll get an idea of how far to drill.
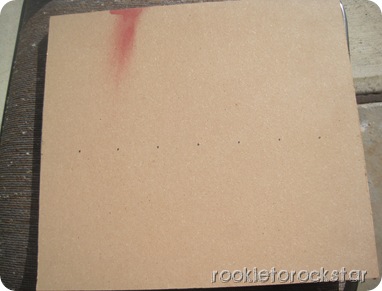
I measured 1.5” further down to make my second row of marks. You will have a total of 14 holes drilled. Here’s my son helping with the drill, so precious! And yes, I got “permission” from my husband to use power tools while 8 1/2 months pregnant. heheIMG_3901 Step #2: Lightly sand the board, especially around the holes. Prime and paint. Seriously should’ve used spray paint, oh well. At least I saved some dinero. =)IMG_3902 IMG_3903 (Primed)

Step #3: Here’s where the Silhouette would’ve come in handy. You can download free fonts galore at dafont.com, amazing website, love it! Instead, I hit up Michael’s and bought some chipboard letters and some Valentine’s scrapbook strips. to decorate the board.

Step #4: Using gloss Mod Podge, seal the whole board with a coat of Mod Podge.

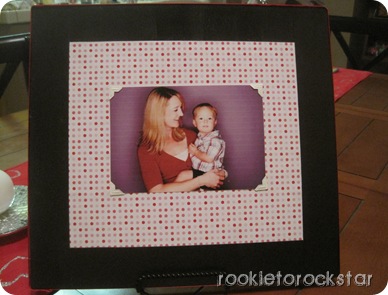
Step #5: Print and cut out numbers 1 through 14 and adhere to the back of the Hershey Kisses. I printed them out on a label so I could peel and stick. IMG_3926 Step #6: I added two final touches that weren’t in the original layout I found online. I added a strip of ribbon around the edges with my glue gun, and mod podged scrapbook paper to the back with photo corners to hold a 4x6 photo. I figured before/after the 14 days, I could display this side with a Valentine’s picture from the previous year. I may add a few more scrapbooking details, but for now, here’s the backside and the cute ribbon detail:IMG_3943 IMG_3944 So…what are you waiting for? Go grab some tools and make your own! I know Cooper will absolutely love getting a kiss each day leading up to Valentine’s…of both varieties. =)

Friday, February 4, 2011

First Movie-Going Experience

IMG_3914 I must admit, I surprised myself when I agreed to take my 27 month old to his first movie theater experience. “That’s far too young,” I could imagine myself saying even just one year ago! But, here I am…being entirely comfortable with it, even outright excited and giddy about it!

Here’s the thing…you’ve got to know your child before you make this decision. I think it’s one of those, “Go with your gut” decisions. My child? Not only does he LOVE movies and will gladly sit through an entire feature length film at home, but he is also an incredibly well-rounded child. Here are a few of the reasons I had no qualms about taking him to see a movie in the theater (in spite of what “studies” will tell you):

  • He rarely watches more than 25 minutes of TV/day
  • He will sit and read books for an hour, no problem, sometimes even longer
  • He has already read his first chapter book          (well, we read it aloud to him, but he could tell you the characters and everything)
  • He spends hours on end running around at the park interacting with other kids
  • He loves a variety of toys at home and has no problem playing make believe (Thomas, cars, his play kitchen, play dough, etc.)

With all that being said, we headed out with my in-laws to see Tangled. IMG_3917Will my poor son be scarred for life knowing his very first theater experience was Tangled? Nah…he’ll get over it. We had a blast! Again, you’ve got to know your own child to know if it’s going to be a success, however, here are a few things that helped us.

#1: Work around nap time.

– We went to a 4:30 showing, just shortly after Cooper wakes up from his nap.

#2: Use a booster seat.

– They have these little booster seats that sort of velcro to the seat that helps keep the folded chair down so your kiddo can sit comfortably. (It’s hard to tell, but he’s sitting on it below)IMG_3921

#3: Bring snacks

– I brought graham crackers, goldfish, raisins and we put his sippy cup with milk in the cup holder. You could treat them super special and bring yummy candy, but I figured the added sugar wasn’t necessary for a fun outing and for him sitting for the entire film.

#4: Wait until the movie has been out in the theater for a short while.

– We saw Tangled after it’d already been in the theater for 2 whole months. That way, when Cooper did ask questions about the movie (because they WILL chat, a bit, right?), he wasn’t disturbing an entire theater of people.

#5: Take pictures to document!

– My husband rolls his eyes at me whenever I whip out the camera, but come on…what a fun thing to document! How cute is my little fella? (See the near empty theater?)IMG_3918A closing remark…as always….remain flexible. If it’s your first movie going experience with a kidlet, know that it’s okay to leave the theater if it’s too difficult or they’re having nothing to do with it. Don’t push it if they’re not ready, and if they are? Have a blast!!  It was precious sitting between my husband and my son during a movie, holding both their hands. Ahh…

Saturday, January 29, 2011

White Chocolate Cranberry Scones

IMG_3883 I’ve pondered putting this recipe on my blog at least 3 other times, and here it is! Seriously, I sometimes invite people over to my house just for an excuse to bake these (some of my friends know exactly those times, hehe). I recently made them for a MOPS (Mothers of Preschoolers) park play date. (For you locals, we hosted it at Kalithea Park in EDH – beautiful, well laid out park if you want to check it out) They were a hit, so I figured I’d post the recipe on my blog so I could refer people interested in the recipe here. =) Simple and delicious!

White Chocolate Cranberry Scones

2 c. flour

1 TBS baking powder

½ tsp salt

¼ c. sugar

¾ c. “add-ins” Chocolate chips, dried fruit, nuts, etc.

1 ¼ c. heavy cream

Directions:

Preheat oven to 425 degrees.

Pour all but heavy cream in large bowl and stir until thoroughly combined. (I add both 3/4c. white chocolate chips and 3/4c. dried cranberries) IMG_3870 Stir in heavy cream until sticky dough is formed – do not over mix!

Lightly flour bread board and knead dough 8-9 times.

Pat into 10” circle. IMG_3872 Brush with 3 TBS melted butter and sprinkle with 2 TBS sugar. IMG_3874 IMG_3875


Cut circle into 12 wedges and place 1” apart on baking sheet. IMG_3876 IMG_3878 Bake about 14-15 minutes or until lightly browned.IMG_3879 Don’t forget to utilize your little helper! My son is learning all kinds of tricks in the kitchen by being my right hand man. I used to freak out having him sit on the counter, now, he knows the drill. I’m still very careful, but he loves being up close and personal.IMG_3871 Here we are enjoying the success of our “hard” work! =) I love that Percy made it in the picture with us even. IMG_3889

5-minute hummus

Yes, I had a craving this afternoon. Following a family walk and park visit, I was craving hummus. And it’s SO simple to make! My husband mocks me for keeping garbanzo beans on hand (for such an occasion as this), yet he too enjoyed the hummus craving! =)

5-Minute Hummus

1 15-ounce can chickpeas, rinsed

1 clove garlic

¼ c. olive oil

2 T fresh lemon juice

2 T tahini (sesame seed paste; optional)

1 tsp ground cumin

Salt

¼ tsp paprika

Directions:

In a food processor, puree the chickpeas and garlic with the olive oil, lemon juice, tahini, cumin, and ¾ tsp salt until smooth and creamy. Add 1-2 T water as necessary to achieve desired consistency.IMG_3847 Transfer to a bowl. Drizzle with olive oil and sprinkle with paprika before serving.IMG_3848We like to eat them with pita chips. Yum! Except you may want to steer clear of us for a day or so, talk about garlic overload. =PIMG_3849