Monday, February 21, 2011

Spicy Sweet and Sour Chicken

IMG_4072 Just tried a new recipe that was a hit with the hubby! Mmm..not terribly difficult or time consuming either. =) (Don’t be overwhelmed by the ingredients list, it is long, but simple ingredients.)

Ingredients

4 tsp. cornstarch, divided

2 T soy sauce, divided

1 tsp. peeled minced ginger

1 tsp. dry sherry (optional)

1/8 tsp. black pepper

2 tsp. garlic cloves, minced

1 lb. skinless, boneless chicken breast, cut into bite-size pieces

½ c. chicken broth

1 T brown sugar

3 T ketchup

2 ½ T rice vinegar

2 tsp. chili garlic sauce (Lee Kum Kee brand=yum!)

1 tsp. dark sesame oil

1 T canola oil, divided

1 large yellow onion

1 large red bell pepper, diced

1 ½ c. diced pineapple

Directions: Combine 2 tsp. cornstarch, 1 T soy sauce, and next 5 ingredients (thru garlic) in a medium bowl.IMG_4059 Add chicken and stir to coat. Set aside. IMG_4060 Combine chicken broth, remaining 2 tsp. cornstarch and 1 T soy sauce with brown sugar thru sesame oil, set aside.IMG_4065 Heat ½ tsp. canola oil over med-high heat. Saute onions and red bell pepper, about 4 minutes, until crisp-tender.IMG_4061 Remove from heat and set aside. IMG_4067 Heat remaining 2 ½ tsp. canola oil; add chicken mixture and spread in even layer in pan. Cook, without stirring 1 minute. IMG_4063 Saute about 3 more minutes until chicken is done. IMG_4069 Return veggies to pan. Add soy sauce mixture, and pineapple, stirring well to combine. Bring to boil, cook 1 minute or until thickened, stirring constantly. IMG_4070 Makes “8” servings. (umm..maybe in some households? My husband and I ate nearly all of it! Oops!) Goes well with rice noodles or rice.

Thursday, February 17, 2011

Silly Faces Game

B00000IZW2.01.LZZZZZZZ
Oh the “exciting” mix of rainy days and toddlers! I purchased the Silly Faces Colorforms game on a whim at HomeGoods (too good a deal to pass up). Who knew that my son would not only love it, but that it would begin to teach him the initial social rules of playing a game! 

I bring you, Trick of the Trade #7! 
Play games with your kids. It does a kid good.

He is learning to take turns and follow rules. The other fun thing this game encourages (which we had already had silly fun doing) is celebrating our different emotions. We will say to Cooper, “Show us your angry face!” or “Show us your sad face…” and he delights in switching into the different roles. My husband and I get a kick out of doing this because it reminds us of a scene in the movie The Imposters with Stanley Tucci and Oliver Platt. I can’t guarantee you’ll like it, it’s very off-beat humor, but my husband and I love it. =) Anyhow, back to the topic at hand, it’s good practice for reviewing emotions. Don’t hesitate to try a game out with your child! You never know, they may be more ready than you would’ve thought.
IMG_4050

Monday, February 14, 2011

Happy Valentine’s Day

So, in staying true to the “purpose” of my blog, I have two thoughts to share on Valentine’s Day regarding building your marriage.

Thought #1:

Celebrate the Past!

My husband and I rarely make a big “to-do” about holidays, particularly Valentine’s Day, and while we still didn’t go overboard this year, we celebrated. And I’m certainly glad we did…allow me to explain.

We did the math and it was our 10 year anniversary celebrating Valentine’s Day together this year. So, our very first romantic Valentine’s date? Kentucky Fried Chicken my friends!! Ha! My poor, adorable husband…we’d only been dating about 2 weeks when we celebrated our first Valentine’s Day, and in his defense, he did plan a very romantic cracker and cheese scenario at the park, where he even played guitar. But, once we wrapped things up there, around 5:30 or 6 in the evening, he casually said, “Where would you like to go to dinner?”

*Ahem*…sorry, you don’t just show up for dinner somewhere on Valentine’s evening!! hehe So, we ended up at KFC. The reason I tell you this, is to help you understand our celebration THIS year.

That’s right ladies (and gentlemen, although I doubt there are any reading this)…we celebrated in STYLE at KFC! IMG_4032I texted my husband this clue to where we would be celebrating:KFC ClueKEN + TUCK (from Bug’s Life…Tuck and Roll?) + E     (the letter e in sign language)
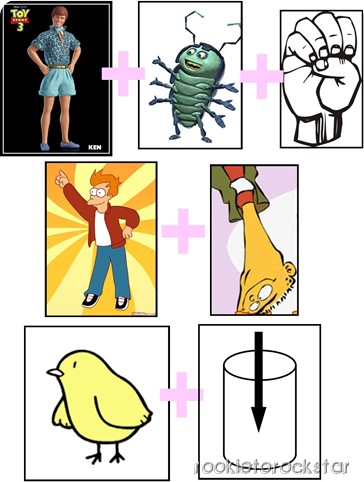
            FRY (from Futurama) + ED (from the cartoon Ed, Edd, & Eddy)

CHICK + IN 

I arrived before him and decorated the table:IMG_4033 I even made “custom” conversation hearts with words significant to us (of course, the really significant ones you can’t see here, but…oh well):IMG_4034 We had a relaxing dinner with our son included. =)IMG_4043 

Thought #2:

Celebrate…with time alone!

IF you have kids…this is crucial. This was all we were planning to do for Valentine’s Day, until the stars aligned and I received a phone call from my in-laws offering to babysit Sunday evening (the night before Valentine’s Day), and I received an e-mail from Sienna (a local restaurant in El Dorado Hills) with their Valentine menu, stating that they still had reservations open.

Cue….Hallelujah music!

I took a hint and made reservations. THEN…here’s the clincher.  The in-laws took them to THEIR house and watched him overnight for us!! Look at how ecstatic our son was to go spend the night with Grandma and Grandpa:IMG_4024 Here’s how our “us” evening went…

Ryan presented me with his gift (prepare for husband bragging…which is also a marriage builder ladies,                R-E-S-P-E-C-T if you don’t know the secret!) He gave me a gift card for dance lessons after baby comes. I’ve been wanting to take ballroom lessons, mmm, basically since we got married. So, HUGELY exciting!

Then, we watched the A-Team (Ryan’s joy, but entertaining I must admit).

Romantic dinner at Sienna. IMG_4027 Then, we went home and enjoyed watching Predators as loud as we wanted, because we had no kid in the house!!

So, to sum it up…even though Valentine’s Day IS the most contrived holiday of them all…take time to dote on the one you love. It doesn’t have to be ON the day, but celebrate somehow!
Sunday, February 13, 2011

Sweetie Pie Pops

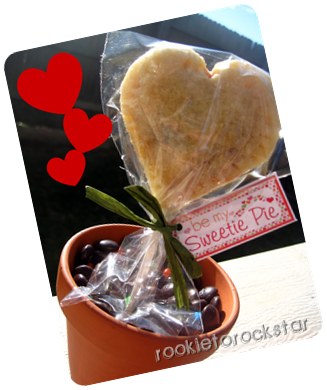
IMG_4014-edited Our Best Bites is helping me step out of my comfort zone in the kitchen! Follow their link to get the step by step instructions (with pictures) for these adorable Pie Pops. They even have the free labels you see that say “Be My Sweetie Pie”. Couldn’t be easier! My friend and I made over 40 for our MOPS (Mothers of Preschoolers) group for Valentine’s Day. What a fun, cheap gift!

Another link you HAVE to check out before you make them is the pie crust recipe over at The Pioneer Woman. I’m not all goo-goo over pie crust, but this recipe is YUM-O!! Even my “chef friend” gave the thumbs up and was impressed at how easy it was.

A few helpful hints, use 6” lollipop sticks (I think they mention this, but, just in case) and the bags we used were 4x6”. I thought for sure that would be too big, but they worked perfectly! Lastly, you really can’t fit very much filling into each pie pop, so go easy, otherwise it oozes out. Also, I didn’t punch holes in mine and they baked perfectly. I used cherry preserves and mini chocolate chips for the filling. The fruit is definitely the way to go! The sweet is divine. =) We tried banana and nutella, but it was a bit dry. Let me know if you try them and how they turn out!IMG_4015-edited

Valentine’s Day Coupon Book

A year of my love My motto is “I’ll test it out for you…”, however, I’m going to fudge the rules on this one a bit. Here’s a link to a super cute Valentine’s Day Coupon Book over at Delightful Order. The reason I’m passing it on without me testing it out is…it’s just not something my husband and I enjoy. BUT, if it were, this one I would use! It’s super cute and reasonable to carry out. The format is giving a coupon for each month of the year. So, enjoy the free printable if this is something that floats your boat. I might save it as an idea down the road. Here’s the idea…there’s a different design for each month, go check it out!a year of my love...opener Happy Valentines Day!


Friday, February 11, 2011

Crayon Roll…aka: I CAN sew!

IMG_4006  I can’t recall if I’ve shared that I received my first sewing machine for Christmas. I was borrowing my poor best friend’s (and breaking parts half the time I borrowed it…sorry friend), and decided it was about time I became acquainted with a machine that was my very own. Then, perhaps I might actually sew more frequently, with less frustration.

IMG_4007So, my first project on my new sewing machine was the valance for my baby girl’s room:IMG_3808 Thankfully, I did have some helpful hands watching over as I made my attempt. But, I was thrilled! It turned out great.

For my next project, I thought I’d try something small, less fabric to destroy in case of total destruction. =) But, the more projects I do, the more comfortable I will become, right?

I found this idea for a Crayon Roll on The Pleated Poppy. Adorable, and maybe will actually get my son to enjoy coloring a bit more! I bought the fabric at Joann’s and completed the project in less than half a day! Not too shabby. I didn’t include step by step instructions, those you can find at the link for the Pleated Poppy above.

Supplies:

2 pieces of same fabric for outside and inside – 5″ x 16 1/2″

1 piece of coordinating fabric for pocket – 6″ x 16 1/2″

1 piece of flannel for lining (color doesn’t matter)– 5″ x 16 1/2″

1 coordinating hair elastic

1 button

needle and thread

1 box of 16 crayons

disappearing ink fabric marker

I will share the two steps that gave me a little hesitation (my motto here on rookietorockstar is I’ve tested it…otherwise, I won’t share). Here’s the final product:

IMG_4008-corrected IMG_4007

IMG_4009

IMG_4010

Step #1: Sewing down the hair elastic.

A hair elastic is thick, people. So, to get it to pass under the sewing machine foot is a bit tricky. But, once you get it, it’s no biggie. Just be persistent (and in my case, using the same color thread as the fabric helped hide any imperfections).

Step #2: Sewing on the button.

I believe they call this an “invisible stitch”? I realized I couldn’t just go through the fabric, because that would sew the pocket closed behind it. So, you have to just catch some fabric as you sew. I was worried because the button obviously needs to be pretty sturdy with toddler fingers pulling at it. But, after lots of stitches, it seems to be pretty sturdy.

Other than that…the project went pretty flawlessly with the instructions provided over at The Pleated Poppy! Yay, another sewing project under my belt. I bought extra fabric and plan to make more for a few friends. Fun, fun! Don’t be shy about sewing ya’ll…just give it a go, like me. If I can do it, you can, trust me!